 A Wing-By-Wing Guide by Ninjalicious
When you read this description of St. Michael's Hospital, you will without doubt conclude that I am a disorganized, babbling idiot, but please allow me to explain. The building itself is insane. I honestly don't know why St. Mike's decided to allow some of its psychiatric patients to design the hospital. St. Mike's is easily the most difficult to navigate building I have ever entered -- I will not be at all surprised when I one day come across a minotaur in some subbasement or other. In reality, this complete architectural anarchy stems from the fact that the hospital grew from one small building to an entire city block too rapidly to allow for any long-term planning. The hospital is built on 150-year-old foundations; the building assumed its present role as a hospital a little over 100 years ago in 1892. At the time, gas lighting and automobiles were still the stuff of science fiction. St. Michael's Hospital has seven wings: A, B, C, D, E, F, Victoria. The wing letters follow no chronological or geographical pattern, indeed, it is impossible to conceive of any rational thought pattern behind these names. Don't even try. Most of these wings are further subdivided into north and south, or old and new. When someone tries to give you directions to somewhere in the hospital, it usually sounds like something out of a Monty Python skit: "C215? Take the A-Wing South stairs down two floors, turn left and walk through to F-Wing, take F-Wing north to E-Wing South, then you can either take D-Wing South north to..." etc. The wings overlap frequently, and the hospital's official visitor's map is more of a desperate cry for help than a useful guide. In spite of this, I will attempt to categorize things on a wing-by- wing basis.
A Wing
B Wing
C Wing
On the ground floor of the hospital, C Wing is given over almost entirely to the Emergency Room. This chaotic area is always jam-packed with the casualties of city living, and is heavily monitored by very blatant ceiling cameras. Floors two through five are pretty much standard fare. Floor six contains the food service area for the entire hospital. If you can summon up the courage to walk through a door or two clearly labeled Employees Only, you will have more than earned the smorgasbord of hospital food and drink which awaits you. Even if you don't have the nerve or the stomach for such bravery, there are some storage rooms and dumb waiter shafts worth peeking into in this area. To access the upper levels, you'll have to use the stairs. There are two main stairwells to the C Wing. The doors to Stairwell One are usually labeled "Emergency Access Only", whereas Stairwell Two is usually free for the climbing. You should use Stairwell One for three reasons: a) it goes to more interesting places, b) it is totally unalarmed and unmonitored and c) the man wants you to use Stairwell Two. Furthermore, since it is possible to access Stairwell One without passing a warning sign (on 4C), you can plead ignorance if there are ever any hassles.
|
 The lowest point of C Wing is a locked engine room. One level up is the engineering floor, where all
the broken hospital equipment is stored and repaired by the various carpenters and metalworkers stationed
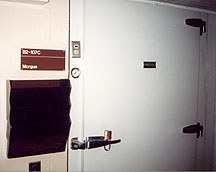
here. The next level is called Admitting/Receiving, and contains more equipment, broken and otherwise,
and also has the honour of housing the immense white fridge, which is the hospital's morgue. Those with a
pulse will find it very difficult to enter. None of these levels are exactly off-limits to the public, but
employees may ask if they can help you if you don't seem to know where you're going.
The lowest point of C Wing is a locked engine room. One level up is the engineering floor, where all
the broken hospital equipment is stored and repaired by the various carpenters and metalworkers stationed
here. The next level is called Admitting/Receiving, and contains more equipment, broken and otherwise,
and also has the honour of housing the immense white fridge, which is the hospital's morgue. Those with a
pulse will find it very difficult to enter. None of these levels are exactly off-limits to the public, but
employees may ask if they can help you if you don't seem to know where you're going.
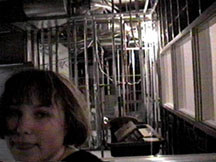
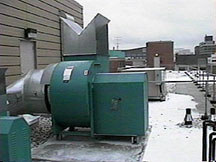 Stairwell One is your ticket to the insanely great mechanical rooms of the 10th floor. The entire full-
sized level consists of various machine rooms, storage rooms and narrow service corridors. The control
room for the C Wing elevators is also located somewhere in this maze. Nothing here is locked, since, in
theory, no-one should ever be here.
Stairwell One is your ticket to the insanely great mechanical rooms of the 10th floor. The entire full-
sized level consists of various machine rooms, storage rooms and narrow service corridors. The control
room for the C Wing elevators is also located somewhere in this maze. Nothing here is locked, since, in
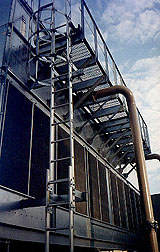
theory, no-one should ever be here. For the same reason, the door to the roof, located one storey up, is also kept unlocked. While the C Wing roof is not the hospital's tallest roof, it is the most fun. There are all sorts of multicoloured toys and ladders up here for you to climb on, climb in and play with. It would make an ideal playground for children, if not for the whole wander-too-far-and-fall-eleven-storeys-to-your-death thing.
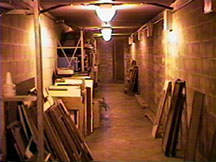
D Wing The fourth floor of D Wing south is a definite highlight of the hospital. This entire wing is an abandoned Intensive Care Unit, which has since been relocated to the Victoria Wing. Elevators don't go to this floor anymore, and some doors to this level are locked, but it is quite accessible to the determined. Once you get there, you have the entirely empty wing to yourself! There are never any patients, visitors or staff in this poorly lit and little maintained level of the hospital, so you can do cartwheels down the main hallway if you want. Though most of the rooms here have been padlocked, some are still open, and house outdated electronic equipment and other medical supplies. There's lots to see and do. Aside from this, D Wing's only attractions are the underground tunnels to the Annex and West Annex, located in a subbasement, and the operating rooms located on floor five. No, they aren't kept locked, and yes, they have well-stocked fridges. All doors to D Wing's very tempting roof are kept locked.
E Wing
There's a recycling/engine room somewhere in this mess, which apparently is occasionally used by employees, but otherwise you should have the place to yourself. Just try not to worry about the fact that your shenanigans are in plain view of everyone with a window view -- they have no idea you're not supposed to be there. Besides, if you explore with determination and can squeeze yourself through some of the skinny corridors, you'll come across the kind of forgotten grottoes that dreams are made of. Allot a minimum of half an hour. Up one level is the E Wing lobby. Until recently, the E Wing's art deco style entrance from Bond Street was the hospital's main entrance. It still houses the hospital's main inquiries desk. The upper levels of E Wing have less to offer: the chapel on the second floor is worth a look, it's a surprisingly big chapel for a hospital, with real stained glass windows, marble floors and the works. The chapel is unmonitored and rarely used, the back rooms are accessible but uninteresting. Also on the second floor is the staff auditorium, where hospital events sometimes occur.
|
 The eight-storey E wing was constructed in 1936 as a gateway between the A, B, C and D wings. The
basement of E Wing is rather fun. An exit at the bottom of the E Wing stairwell leads into a bunker-like
cement hallway, filled with old air conditioners and other debris. Exit through one of the doors leading off
from the Hall of Air Conditioners and prepare thyself for NOOKMANIA. The outdoor courtyard
sandwiched between E Wing, C Wing and D Wing is a lot of fun. There are ladders everywhere, as there
are many different levels to ascend. With determination and luck, you can climb up four levels and still be
on the outside of the hospital.
The eight-storey E wing was constructed in 1936 as a gateway between the A, B, C and D wings. The
basement of E Wing is rather fun. An exit at the bottom of the E Wing stairwell leads into a bunker-like
cement hallway, filled with old air conditioners and other debris. Exit through one of the doors leading off
from the Hall of Air Conditioners and prepare thyself for NOOKMANIA. The outdoor courtyard
sandwiched between E Wing, C Wing and D Wing is a lot of fun. There are ladders everywhere, as there
are many different levels to ascend. With determination and luck, you can climb up four levels and still be
on the outside of the hospital. 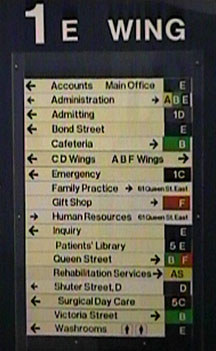 The courtyard is filled with junk the hospital has never gotten the nerve to throw away, such as old car
parts, doors and medical gadgetry. The entire courtyard is surrounded by 12-storey walls, which make the
out-of-date signs on courtyard walls warning that "vehicles parked in this area will be tagged and towed"
seem rather absurd. This area is the former site of a road called Victoria Lane, which was narrowed and
redirected several times before finally being completely consumed by the hospital.
The courtyard is filled with junk the hospital has never gotten the nerve to throw away, such as old car
parts, doors and medical gadgetry. The entire courtyard is surrounded by 12-storey walls, which make the
out-of-date signs on courtyard walls warning that "vehicles parked in this area will be tagged and towed"
seem rather absurd. This area is the former site of a road called Victoria Lane, which was narrowed and
redirected several times before finally being completely consumed by the hospital.
 F Wing
The 12-storey F wing was added in the 1960's, but don't let the fact that it's new scare you off. It's a nice wing. The basement houses storerooms, locker rooms, the employee cafeteria and the security office. After that, there's nothing truly special 'til the upper floors, all of which should be accessed via the stairs. F Wing has two stairwells: the doors to the south stairwell are labeled "Not For Patient Use", whereas the doors to the north stairwell are labeled "Emergency Exit Only". Disregard these notices totally. The doors aren't locked, alarmed or monitored. If you're caught in the south stairwell, just say you're not a patient. If you're ever caught in the north stairwell, you can just say you entered the stairwell from the Victoria Wing, where there are no signs. The warning signs are in place because the stairs go to such neat places. The 10th storey is worthy of special notice. All the doors to this level are locked, and a sign declares "The 10th floor is a secured area accessible to authorized personnel only." The doors can only be opened by punching the correct access code into a keypad or by ringing a doorbell beside the door. The purpose of this mystery floor is not revealed anywhere in the hospital, but the book For The Least of My Brethren explains that 10F is actually an animal testing facility! The high security and high secrecy are obviously designed to exclude protesters. Regrettably, they have succeeded in keeping me out.
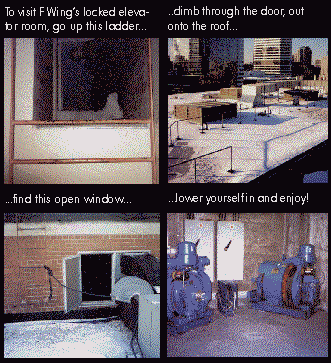
There are no cameras on the 11th storey, and I've never encountered any employees, but when you're nervous enough the whirring of gears can sound incredibly similar to the opening of doors or the approaching of footsteps. If you can work up the nerve to cross the entire level, you will find a door leading to F Wing's north (emergency) stairwell. This door will automatically lock behind you. The door at the top of the south stairwell is locked. Don't allow the rhythmic whirring emanating from behind this door to drive you insane with curiousity; there's a way in. Get yourself to the top of the north stairwell. You will see a short orange ladder leading up to a tiny door; through the door lies the F Wing roof. On the whole, the F Wing roof is not as interesting as the C Wing roof, though it is a few storeys taller (13 storeys tall, if you climb a ladder or two). Searching around a bit, you'll come across an unlocked window. Open the window and lower yourself into that rhythmic whirring room you encountered earlier. It's the elevator control room for F Wing. The whirring sound is the cords that haul the elevators up and down spinning around on their turbines. You can exit this room through the window or through the door (which leads to the top of the south stairwell).
Victoria Wing
The next few levels of V Wing are far too well-organized and tightly locked up to be much fun. As mentioned, the sixth storey is as high as the open-to-the-public area of the V Wing goes. A very large new kitchen and cafeteria are under construction here, and there is much to see and do. To get beyond the sixth storey, go through the generally unlocked construction door on level 7 of the F Wing. At the time of this writing, construction on levels 7 through 10 was just progressing beyond the wiring, plumbing and drywall stage, but they've probably started bringing some of the fun stuff upstairs by now. Level 11 is a locked engine room, and level 12 is a locked-from-the-inside doorway to the F Wing roof.
|
 The 11th storey, accessible via the south (no patients) stairwell, is a fun one indeed. Almost the entire
level is a massive engine room, filled with hundreds of hospital-coloured (turquoise) pipes and boilers and
the whole deal. The only other room on the 11th storey is the delightfully bizarre Gallery of Forsaken
Toilets; a large room which appears to exist solely as the home for shelf after shelf of old and/or broken
toilets. Heartbreaking.
The 11th storey, accessible via the south (no patients) stairwell, is a fun one indeed. Almost the entire
level is a massive engine room, filled with hundreds of hospital-coloured (turquoise) pipes and boilers and
the whole deal. The only other room on the 11th storey is the delightfully bizarre Gallery of Forsaken
Toilets; a large room which appears to exist solely as the home for shelf after shelf of old and/or broken
toilets. Heartbreaking. 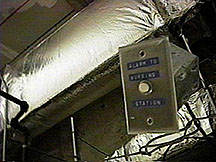
 V Wing has two basement levels, the lower of which is still kept locked. The main hall of the upper
basement is watched over by at least one camera, as are the main halls of all other levels of V Wing. I
have no idea whether or not these cameras have been activated yet, or even if they are real, and I know the
Victoria Wing does not have its own security department, but still... they totally kill the mood for me. But
if you can forget about Big Brother's glare, the main level of V Wing offers several opportunities to sneak
into construction areas as the doors are usually unlocked. Also located in the V Wing lobby is a statue of
St. Michael, who resides in his own spotlit altar. Nuns originally found the statue in a second-hand store
on Queen Street in the 1890s, and purchased it for $49. (Until recently, the statue had been located in the
E Wing lobby, but now the only statuary the E Wing has is a statue of St. Michael outside its main doors.
The right toe and nose of this outdoor statue extend a few centimeters onto city property; until 1973 the
hospital was compelled to pay the city $224.43 annually to rent this space! St. Michael, by the way, is the
leader of the seven archangels, patron saint of the sick, grocers, sailors, soldiers, Germany and France. He
is famed for casting Lucifer into hell on God's behalf.)
V Wing has two basement levels, the lower of which is still kept locked. The main hall of the upper
basement is watched over by at least one camera, as are the main halls of all other levels of V Wing. I
have no idea whether or not these cameras have been activated yet, or even if they are real, and I know the
Victoria Wing does not have its own security department, but still... they totally kill the mood for me. But
if you can forget about Big Brother's glare, the main level of V Wing offers several opportunities to sneak
into construction areas as the doors are usually unlocked. Also located in the V Wing lobby is a statue of
St. Michael, who resides in his own spotlit altar. Nuns originally found the statue in a second-hand store
on Queen Street in the 1890s, and purchased it for $49. (Until recently, the statue had been located in the
E Wing lobby, but now the only statuary the E Wing has is a statue of St. Michael outside its main doors.
The right toe and nose of this outdoor statue extend a few centimeters onto city property; until 1973 the
hospital was compelled to pay the city $224.43 annually to rent this space! St. Michael, by the way, is the
leader of the seven archangels, patron saint of the sick, grocers, sailors, soldiers, Germany and France. He
is famed for casting Lucifer into hell on God's behalf.)
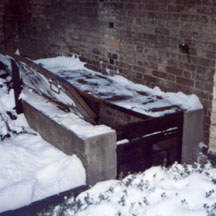
While outside wandering the perimeter, however, I was surprised to come across two immense iron
doors set into the ground in the garden on the north side of the cathedral. Brushing away large quantities
of snow, I uncovered the handles and nearly killed myself heaving one of the doors open. The opened door
revealed a holy vision more glorious than anything seen by the worshipping masses next door: a flight of
narrow iron stairs descending into darkness. I was fortunate enough to have a flashlight with me, so I
clambered down two flights of stairs into a noisy, pitch-black engine room with cracking walls and
peeling paint. The dank basement smell was pure heaven. I wouldn't have guessed anyone had been down
there for a decade if I hadn't found a Coffee Time cup. Alcoves sheltered two small (three-foot-high)
doors, both of which were locked, but which presumably lead to tunnels to the cathedral's secret crypt and
treasure room.
This article originally appeared in Infiltration 2 (January 1997), together with an article on the abandoned Arctic Gardens factory.
|
